Disclaimer: The content of this post is not approved nor endorsed by IBM.
Intro:
In this blog, we will discuss how to configure Spectrum Scale Swift and Keystone alongside HAProxy. Not only will HAProxy act as our load balancer but it will also allow us to send swift and keystone requests via SSL.
Agenda:
- Resources
- Test Environment / Preqrequisites
- Installing HAProxy
- Configuring HAProxy
- Demonstrate Swift/Keystone and HAProxy in action
Resources
- Configuring Spectrum Scale Object
- IBM Spectrum Scale FAQ
- IBM Spectrum Scale Installation Guide
- HAProxy Tutorial
- HAProxy Documentation
- HAProxy Downloads Page
Test Environment / Preqrequisites
For this tutorial, we will use the same test environment we used to configure Spectrum Scale Object. (Configuring Object Using IBM Spectrum Scale) To recap, our test environment consists of several nsd server nodes and two ces protocol nodes which will export our object data and which also have swift and openstack clients installed. These nodes have already been configured with Object using the steps outlined in the Object configuration tutorial. Finally, we will have one additional node which will run HAProxy. Note that the HAProxy node does not have to be a Spectrum Scale/GPFS node and simply be any external node.

HAProxy with SSL: In order to run HAProxy over SSL, we will need either a self-signed or CA signed ssl certificate along with its respective private key in the proper PEM format. The web has many tutorials on generating self-signed ssl certificates including this excellent tutorial which we referenced:
digitalocean.com haproxy tutorial
Installing HAProxy
In order to configure HAProxy with SSL, we need to download HAProxy V1.5x or greater. You can download the source files directly from http://www.haproxy.org
For complete instructions on installing/configuring HAProxy, please visit: http://www.haproxy.org/#docs
or download the rpms:
x86 rpm:
http://rpmfind.net/linux/rpm2html/search.php?query=haproxy%28×86-64%29
ppc64 environments:
http://rpmfind.net/linux/rpm2html/search.php?query=haproxy%28ppc-64%29
As mentioned, for our setup, HAProxy was installed on an external (non-GPFS) node since Spectrum Scale/GPFS is not required to be running on the HAProxy node. In our case, we installed HAProxy on c6f2bc4n3.
Configuring HAProxy
Now that HAProxy has been installed on one of our available nodes, we are ready to configure HAProxy. The configuration process is fairly straight forward since most of the default settings can remain the same.
Our HAProxy node, c6f2bc4n3 has both a physical IP address 192.168.105.145 and a virtual IP address which will be the IP address 192.168.6.100 that HAProxy will listen to requests on. The virtual IP address is also the same ces IP address that will be configured for the keystone and swift endpoints:


- HAProxy Logging: This is optional but recommended, especially when you are troubleshooting problems with HAProxy and you want to confirm whether the requests are coming in and being handled by the expected HAProxy backend.
Add these lines to /etc/rsyslog.conf:
$ModLoad imudp
$UDPServerRun 514
$UDPServerAddress 127.0.0.1
local5.* -/var/log/haproxy.log
Restart the rsyslog service: service ryslog restart
Finally open /var/log/haproxy.cfg and add this line under the global settings:
log 127.0.0.1 local5
- HAProxy Default Settings: In our setup, we added a few additional parameters to the defaults section within /var/log/haproxy.cfg. This is what our configuration file looked like with respect to the defaults section:
defaults
mode http
option forwardfor
option http-server-close
log global
option httplog
option dontlognull
option http-server-close
option forwardfor except 127.0.0.0/8
option redispatch
retries 3
timeout http-request 10s
timeout queue 1m
timeout connect 10s
timeout client 1m
timeout server 1m
timeout http-keep-alive 10s
timeout check 10s
maxconn 3000
- HAProxy Frontend: For our configuration, we configured four front ends:
One frontend that will handle incoming keystone http requests:
frontend keystone-http
bind 192.168.6.100:35357
reqadd X-Forwarded-Proto:\ http
default_backend keystone-backend
The frontend name can be any name you choose. The bind address is the virtual IP address that will be used by HAProxy to listent to incoming requests. The reqadd X-Forwarded line adds a http header to end of the HTTP request. Finally, the request will be handled by our specified backend ‘keystone-backend’ which will be defined in a later example.
One frontend that will handle incoming keystone https requests:
frontend keystone-https
bind 192.168.6.100:5000 ssl crt /etc/haproxy/haproxynode.pem
reqadd X-Forwarded-Proto:\ https
default_backend keystone-backend
You will notice this extra string ‘ssl crt /etc/haproxy/haproxynode.pem‘ which specifies the ssl certificate path and name that will be used for SSL. Also, a https header will be added to the end of the request this time. Our backend remains the same.
One frontend that will handle incoming Swift http requests:
frontend swift-http
bind 192.168.6.100:8080
reqadd X-Forwarded-Proto:\ http
default_backend swift-backend
We have a separate backend to handle swift requests since swift listens for requests on port 8080.
Finally one frontend that will handle incoming Swift https requests:
frontend swift-https
bind 192.168.6.100:8081 ssl crt /etc/haproxy/haproxynode.pem
reqadd X-Forwarded-Proto:\ https
default_backend swift-backend
- HAProxy Backend: Two backends were configured to process the requests that are forwarded by the defined front ends:
One backend that will handle the forwarded keystone http/https requests:
backend keystone-backend
balance roundrobin
server k1 192.168.11.5:35357 check inter 5s
server k2 192.168.11.6:35357 check inter 5s
server k3 192.168.11.7:35357 check inter 5s
server k4 192.168.11.8:35357 check inter 5s
We only need one backend to handle both http and https keystone requests. We will use the roundrobin algorithm to decide which backend servers will process the incoming requests. In our example above, we have 4 different keystone backend servers/ces ip addresses that will handle our keystone requests and these are identified as k1-k4. The check inter 5s means that we will check these servers every 5 seconds to ensure they are responsive.
One backend that will handle the forwarded Swift http/https requests:
backend swift-backend
balance roundrobin
server s1 192.168.11.5:8080 check inter 5s
server s2 192.168.11.6:8080 check inter 5s
server s3 192.168.11.7:8080 check inter 5s
server s4 192.168.11.8:8080 check inter 5s
Once again, we have 4 swift backend servers/ces ip addresses that will handle our swift requests and these are identified as s1-s4.
Once all of the HAProxy settings are in place, we need to restart the HAProxy service in order for these settings to take effect:
service haproxy restart
Demonstrate Swift/Keystone and HAProxy in action
Now that we have HAProxy configured, we are ready to test our swift and keystone. As mentioned previously, we assume that swift and keystone have been previously configured. If not, please refer to the Configuring Object Using IBM Spectrum Scale blog post for more information.
The first thing we will do is copy over the HAProxy ssl certificate (haproxynode.pem) that we generated on the haproxy node in the earlier steps to one of our protocol nodes. For this example, we will run our tests from node c40bbc2xn3. For the first test, we will try to access the keystone and swift http haproxy backends. To do this, we need to first load our standard openrc file which by default is located under /root:
c40bbc2xn3:~ # source openrc
The standard out of the box openrc file will look something like this:

As mentioned previously, if you don’t want to be prompted to provide the password each time you execute an openstack or swift command, then you can explicitly specify the password in the openrc file.
Let’s list the current users:
openstack user list
| mfsct-iou50 | mfsct-iou50 |
| ksadmin | ksadmin |
| ari | ari |
| Bill | bill |
| swift | swift |
| aduser1 | aduser1 |
+—————+—————+
We should see a corresponding entry in the /var/log/haproxy.log on our haproxy server node that looks similar to this:
2015-08-11T22:22:54-04:00 localhost haproxy[7027]: 192.168.40.73:39897 [11/Aug/2015:22:22:54.695] keystone-http keystone-backend/k3 0/0/0/4/4 200 465 – – —- 1/1/0/1/0 0/0 “GET /v3 HTTP/1.1”
2015-08-11T22:22:55-04:00 localhost haproxy[7027]: 192.168.40.73:39897 [11/Aug/2015:22:22:54.699] keystone-http keystone-backend/k4 2/0/1/414/417 200 8177 – – —- 1/1/0/1/0 0/0 “GET /v3/users HTTP/1.1”
Looking at the haproxy log entries we will notice a few things. First, we see the node that submitted the request which in this example was our protocol node whose physical ip address is: 192.168.40.73:39897.
The request was initially handled by the keystone-http front end and then processed by the keystone-backend. Server K3 which is mapped to ces ip 192.168.11.7:35357 was selected in a round robin fashion as the server to handle the request.
Finally, “GET /v3/users HTTP/1.1” indicates that a GET request to list the current users via HTTP was processed.
Let’s now show what a simple swift command will look like:
swift stat
Account: AUTH_cd3ce00824f44f63ae9ec532b5d964fa
Containers: 0
Objects: 0
Bytes: 0
X-Put-Timestamp: 1439415671.02249
X-Timestamp: 1439415671.02249
X-Trans-Id: tx1027924823ff4884bf17c-0055cbbd75
Content-Type: text/plain; charset=utf-8
/var/log/haproxy.log from proxy node:
2015-08-11T22:24:37-04:00 localhost haproxy[7027]: 192.168.40.73:54720 [11/Aug/2015:22:24:36.184] swift-http swift-backend/s2 0/0/0/1491/1491 204 339 – – —- 1/1/0/1/0 0/0 “HEAD /v1/AUTH_cd3ce00824f44f63ae9ec532b5d964fa HTTP/1.1”
Similar to the openstack command, we see that the same ces node submitted the swift command. We also see that the swift-http front end initially processed the request and then forwarded it to the swift-backend. The s2 server actually handled the request.
Let’s now show how we can connect to our haproxy server using ssl. The easiest way to do this is to modify our existing openrc file or create a new openrc file. The modified openrc file will look similar to this:
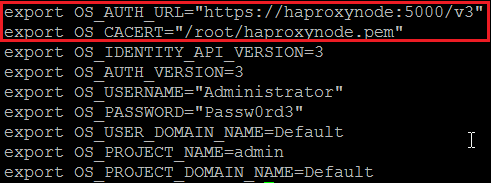
The OS_AUTH_URL value above specifies that we will connect to our proxynode using https over port 5000. This is the same port we specified in our haproxy.cfg for our https backend.
The OS_CACERT value specifies the location of our haproxy cert file that we copied over from our haproxy node.
Assuming we modified the existing openrc file, we need to reload the file:
c40bbc2xn3:~ # source openrc
Now we will run the following openstack command:
openstack project list
+———————————-+———+
| ID | Name |
+———————————-+———+
| cd3ce00824f44f63ae9ec532b5d964fa | admin |
| 41dfc8a0cbac414685c53c5543fa71fd | service |
+———————————-+———+
We should expect to see something similar to this in the haproxy log:

Notice how this time, the request was handled by the keystone-https front end and then forwarded to the keystone-http backend which is working as expected.
Finally, let’s look at our swift command:
swift –os-storage-url https://haproxynode:8081/v1/AUTH_cd3ce00824f44f63ae9ec532b5d964fa stat


You should notice one request to authenticate against keystone and another request to process the swift command.
