Disclaimer: The content of this post is not approved nor endorsed by IBM.
Intro:
This is a quick start guide for configuring object using IBM Spectrum Scale. We will focus on configuring object with AD and LDAP. This guide is not intended as a substitute for the official Spectrum Scale installation guide but it should highlight some of the main steps involved in configuring Object access using an existing Spectrum Scale/GPFS cluster.
Agenda:
- IBM Spectrum Scale Resources
- Test Environment / Preqrequisites
- Configuring Object using the Spectrum Scale Installer
- Validate Object Authentication Configuration
- Demonstrating swift and openstack basic commands
- Configuring Object Authentication using the command line
IBM Spectrum Scale Resources:
Test Environment:
For this tutorial, we will be using an existing Spectrum Scale/GPFS cluster running version 4.1.1. The test cluster consists of 3 nsd server nodes (nodes 1-3) and 2 ces nodes (nodes 17, 18) which will export our object data:

We also have to existing file systems, cesfs which will store the necessary configuration data and testfs which will store our actual object data:
 Finally, we have allocated a few ces IP address which will be used to host the various object services such as the postgres and keystone services:

Configuring Object Using the Spectrum Scale Installer:
For the actual installation of object, we will be using the Spectrum Scale Installer which you can download through IBM. Once you have downloaded the installer, you need to copy it to one of your cluster nodes which will serve as the installation node. This node should have passwordless ssh access to the other nodes in the cluster since it will run the chef server that is required for the installer.
- Extract necessary installation files and configure yum repos by executing the installer script:

- Setup the installation node:

- Add the first ces node and it’s respective export IP addresses:

- Add the second ces node and it’s respective export IP address:

- Designate our first ces node as the admin node:

- Set file system and mount point:

- Enable Object protocol:

- Set Keystone endpoint hostname:

- Set the file system, mount point and object base fileset to be used (note: the file set must not already exist as this step will create it):

- Configure Object authentication: If you want to configure Object with AD or LDAP authentication using the installer, then this step is necessary. If you want to configure object with local database authentication, then this step is not necessary since by default, object is configured with local database authentication (authentication information is stored in a postgres database).There are 4 authentication options to select from: (ldap|ad|local|external) For the purposes of this tutorial, we will only cover AD and LDAP which require essentially the same exact steps in order to configure. Note, you can only configure AD or LDAP for object authentication.
Object with AD: ‘spectrumscale auth object ad’ After executing this command, you will be prompted to open the authentication configuration file which will allow you to configure the necessary AD related configuration settings:
 Object with AD + TLS: If you would like to configure object with AD + TLS, then you need to specify a couple of additional parameters inside the authentication configuration file. A copy of the TLS certificate must be copied locally to the install node. In this example, the TLS certificate has been copied to: /var/mmfs/tmp/object_ldap_cacert.pem which is where it would need to be copied if you were to configure object authentication using the command line:
 Save changes:
 Object with LDAP / LDAP + TLS: ‘spectrumscale auth object ldap’ After executing this command, you will be prompted to open the authentication configuration file which will allow you to configure the necessary LDAP related configuration settings. The authentication configuration file will appear exactly the same as the the configuration file shown previously for AD configuration.
11. Confirm the current installation configuration: 12. Run Installation Precheck:
 13. Run Installation:
 Post Installation: As an optional step, you can run an installation post check to ensure the installation went as planned: ‘spectrumscale deploy –postcheck’ Ideally, the installation should succeed with some occasional warnings. However, in some cases, the installation may fail due to incorrect configuration settings or environmental issues. In the event of an installation failure, consult the log file for more details. Once the underlying problems have been addressed, you should be able to rerun the installation.
Object Authentication Validation:
Assuming the installation succeeded, we are now ready to validate our object configuration.
Let’s start by checking the cluster configuration settings which should confirm whether object was properly configured during the installation. You should expect to see that OBJ is enabled and the CES IP addresses have been assigned to the respective CES nodes: ‘mmlscluster –ces’

Next, let’s run ‘mmuserauth service list –data-access-method object’ to list the existing authentication configuration. The authentication type you configured in the installation step should be listed: Finally, let’s run ‘mmces service list –all’ , to ensure that Object is running on our two ces nodes:
Validating Object Authentication Using swift and openstack clients:
Now that we have confirmed object was installed and configured properly, we can move on to the fun stuff. By default, both the swift and openstack clients are installed on the ces nodes during the installation process. In general, the swift client as the name suggests is used to interact with the swift service to perform operations such as adding, removing and reading objects from the swift repository. The openstack client is mainly used to interact with the keystone service whose primary function is to provide identity and authentication capability for the ces cluster.
openrc file: Before we being to explore some of the swift and openstack commands, we need to familiarize ourselves with the openrc file that was created during the installation.The openrc file contains all of the relevant swift/keystone environment variables that will be used to interact with both swift and keystone. You load the file the same way you would load your typical environment profile such as .profile, etc. If you don’t load the environment variables contained in the openrc file, then you will need to explicitly specify each of these parameters in the command line along with their respective values. A typical openrc file would look something like this: One thing to notice is that the OS_PASSWORD parameter is blank by default and so you will be prompted to enter a password whenever you execute a swift or openstack command. This is done for security reasons. If you don’t want to be prompted each time to enter a password and you understand the security risks, you can specify the password in the openrc file and then reload it.
For our example, we have Object configured with AD as the authentication backend and so whenever we execute a swift or openstack command, the swift or openstack user will authenticate against AD in order for the request to be processed.
Openstack:
One thing to note is that the keystone AD/LDAP interface is read only and so you cannot create new AD/LDAP users via openstack/keystone.
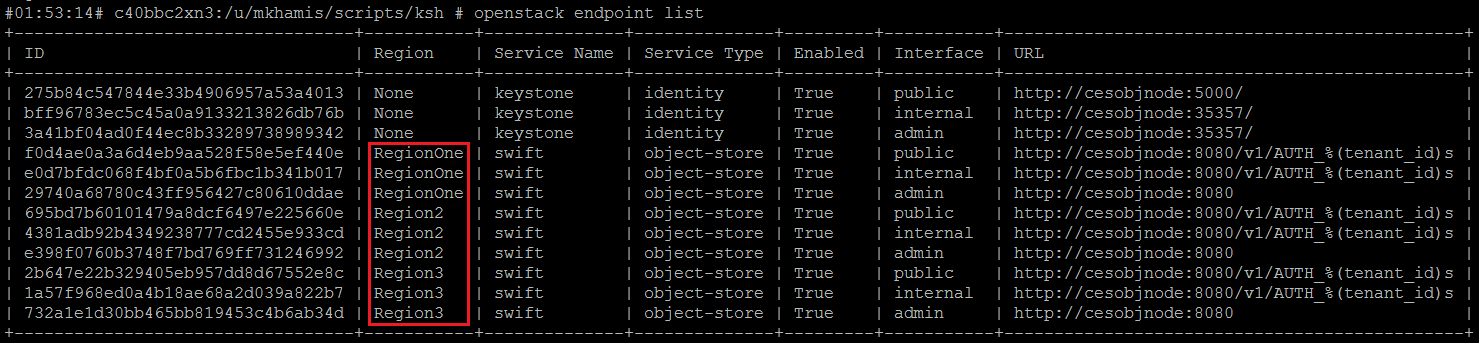
Let’s start by listing the current keystone endpoints: ‘openstack endpoint list –os-password password ‘Next, let’s list the current projects. By default, two projects are created during setup: admin and service: ‘openstack project list –os-password password’
 Let’s list the current users in AD: ‘openstack user list –os-password password’

Show the currently defined roles: ‘openstack role list –os-password password’

Now the fun begins. Let’s create a new role called ‘test-role’: ‘openstack role create test-role –os-password password’
Show basic information about the new role using the show command. This time we won’t specify the –os-password parameter and so we should instead be prompted for the password: ‘openstack role show test-role’

Let’s now create a new project called “test-project”: ‘openstack project create –description “my test project” test-project –os-password password’

Finally, let’s assign our newly created ‘test-role’ to one of our existing AD users and then confirm that the role is assigned to our test user. Notice that we need to specify a project ID and so in this case, we will use the test-project ID: ‘openstack role add –user aduser1 –project 1c1aeace6e9745568f462b889933e8a3 test-role’

Swift:
Let’s begin by introducing the ‘stat’ command which will display basic information about swift. Initially, there will be no containers nor any objects stored in swift: ‘swift stat –os-password password’

Let’s create a new container called “test-container”: ‘swift post “test-container” –os-password password’

Let’s now upload two new objects into our “test-container”. In this example, the objects were stored locally on our ces node: ‘swift upload “test-container” object1 object2 –os-password password’

Finally, let’s download ‘object1’ from our “test-container”: ‘swift download “test-container” object1 –os-password password’

Configuring Object Authentication Via the Command Line:
In addition to configuring Object authentication using the installer toolkit, you can also configure object authentication using the ‘mmuserauth service create’ command directly from the command line. For more detailed information about the mmuserauth command, please reference IBM Spectrum Scale Advanced Admin Guide. There are different valid scenarios that may warrant the need to configure object authentication using the command line:
- Object was installed/configured manually (not using the install toolkit) and so authentication needs to be configured manually.
- Object was installed but Object authentication was not configured using the install toolkit
- Object was installed and configured using the install toolkit but requirements have since changed or a mistake was made during the configuration process
There may be additional valid scenarios but these three listed here should be sufficient for now. The first scenario will be handled separately because it requires a couple of additional prerequisite steps before we are able to configure Object authentication from the command line. The last two scenarios will require the same steps so we will handle these two scenarios together.
- Scenario 1 (Object was not installed/configured using the install toolkit)
Assuming that Object was not originally installed/configured using the install toolkit, then we need to run one additional prerequisite command (mmcesobjcrbase) before we can configure Object authentication using AD or LDAP. We still assume however that the required Object RPMs have been installed. Once the prerequisite step has been completed we need to manually enable Object. After that, we will jump down to the steps outlined for Scenario 2 and 3 to configure Object with AD or LDAP.
The mmcesobjcrbase command will run all the necessary steps that will be required to properly configure Object. It will essentially execute the same steps that are executed when Object is enabled using the install toolkit. Once the command successfully completes, Object with Local (database) authentication will be configured. mmcesobjcrbase will fail if Object is already enabled or if Object Authentication is already configured. Object authentication must be removed and the Object service must be disabled prior to running the command.
At a minimum, we need to specify values for the following parameters:
-g GPFSMountPoint (this is where the object fileset store the object configuration files will be created)
–cluster-hostname (this is the same as the –ks-dns-name which is the keystone endpoint name)
–local-keystone|–remote-keystone-url (If the keystone server is running on the local node, then you should specify –local-keystone. Otherwise, you need to specify –remote-keystone-url along with the full url path to the remote keystone server)
–admin-password (password for the keystone admin user)
–admin-user defaults to ‘admin’ if not explicitly specified
–swift-user defaults to ‘swift’ if not explicitly specified
-O (ObjFileset name to be created) defaults to ‘object_fileset’
mmcesobjcrbase -g /gpfs/cesfs –cluster-hostname cesobjnode –local-keystone –admin-user admin –admin-password Passw0rd
mmcesobjcrbase: Validating execution environment.
mmcesobjcrbase: Performing SELinux configuration.
mmcesobjcrbase: Creating fileset /dev/cesfs object_fileset.
mmcesobjcrbase: Configuring Keystone server in /gpfs/cesfs/ces/object/keystone.
mmcesobjcrbase: Creating postgres database.
mmcesobjcrbase: Setting cluster attribute object_database_node=192.168.11.5.
2015-08-10 17:05:06.787 12181 WARNING keystone.cli [-] keystone-manage pki_setup is not recommended for production use.
mmcesobjcrbase: Validating Keystone environment.
mmcesobjcrbase: Validating Swift values in Keystone.
mmcesobjcrbase: Configuring Swift services.
mmcesobjcrbase: Setting cluster attribute object_singleton_node=192.168.11.7.
mmcesobjcrbase: Uploading configuration changes to the CCR.
mmcesobjcrbase: Configuration complete.
Now we need to enable the OBJ service:
mmces service enable OBJ
c40bbc3xn7.gpfs.net: object: service is disabled
c40bbc2xn3.gpfs.net: object: service is disabled
mmchconfig: Command successfully completed
mmchconfig: Propagating the cluster configuration data to all
affected nodes. This is an asynchronous process.
Object should now be enabled and configured with local (database) authentication:
mmuserauth service list –data-access-method object
OBJECT access configuration : LOCAL
PARAMETERS VALUES
————————————————-
ENABLE_KS_SSL false
ENABLE_KS_CASIGNING false
KS_ADMIN_USER admin
So at this point, Object has been successfully configured. If we need to reconfigure Object with AD or LDAP authentication, then we can follow the steps outlined below:
- Scenario 2 and 3 (Object was installed/configured using the install toolkit):
When using the install toolkit, if you enable Object, then Object is configured with local (database) authentication by default if you do not specify any other authentication method. With local authentication, you need to manually add and set object users and passwords in the local postgres database using openstack commands. If you realize later however that you wish to integrate object with your existing AD or LDAP environment, then you will need to reconfigure Object authentication to achieve this:
Let’s start by listing the current Object authentication configuration using the mmuserauth service list command:
mmuserauth service list –data-access-method object
OBJECT access configuration : LOCAL
PARAMETERS VALUES
————————————————-
ENABLE_KS_SSL false
ENABLE_KS_CASIGNING false
KS_ADMIN_USER none
Next, we will now remove the existing Object authentication configuration using the mmuserauth service remove command:
mmuserauth service remove –data-access-method object
mmuserauth service remove: Command successfully completed
We need to run the command one more time to remove the ID Mapping:
mmuserauth service remove –data-access-method object –idmapdelete
mmuserauth service remove: Command successfully completed
We can confirm Object with Local authentication was successfully removed:
mmuserauth service list –data-access-method object
OBJECT access not configured
PARAMETERS VALUES
————————————————-
Configuring Object authentication with with keystone https (SSL):
Before we can configure object with keystone https, we need to either have self-signed or CA-signed SSl certificates. For the purposes of this example, we will create self-signed SSL certificates using the keystone-manage utility.
We will begin by adding/modifying the following section within the keystone.conf file (/etc/keystone/keystone.conf)
[eventlet_server_ssl]
enable = false (this will be toggled to true once mmuserauth commands is executed)
certfile = /etc/keystone/ssl/certs/ssl_cert.pem
keyfile = /etc/keystone/ssl/private/ssl_key.pem
ca_certs = /etc/keystone/ssl/certs/ssl_cacert.pem
cert_subject = /C=US/ST=Unset/L=Unset/O=Unset/CN=cesobjnodetest (this name has to match the endpoint name you specify)
Save and exit
Run keystone-manage ssl_setup –keystone-user keystone –keystone-group keystone –rebuild
You will get warnings which you can ignore for now. You should now have these keys in this location:
/etc/keystone/ssl/certs # ls -l
rw-r—–. 1 keystone keystone 1277 Aug 10 17:05 signing_cacert.pem
-rw——-. 1 keystone keystone 4251 Aug 10 17:05 signing_cert.pem
-rw-r—–. 1 keystone keystone 920 Aug 31 10:38 ssl_cacert.pem
-rw-r—–. 1 keystone keystone 2864 Aug 31 10:38 ssl_cert.pem
/etc/keystone/ssl/private # ls -l
-rw-r—–. 1 keystone keystone 887 Aug 31 10:38 cakey.pem
-rw——-. 1 keystone keystone 1675 Aug 10 17:05 signing_key.pem
-rw-r—–. 1 keystone keystone 887 Aug 31 10:38 ssl_key.pem
Let’s verify the ssl cerificate to ensure the name is valid:
/etc/keystone/ssl/certs # openssl verify ssl_cacert.pem
ssl_cacert.pem: C = US, ST = Unset, L = Unset, O = Unset, CN = cesobjnodetest
error 18 at 0 depth lookup:self signed certificate
OK
Now copy these files to /var/mmfs/tmp location:
#10:46:00# c40bbc2xn3:/var/mmfs/tmp # ls | grep ssl
ssl_cacert.pem
ssl_cert.pem
ssl_key.pem
We are now ready to configure Object Authentication with Keystone https (SSL). We can configure object with local (database) authentication or Object with AD or LDAP. For this example, we will configure Object with local authentication but the same steps can be followed to configure AD or LDAP:
mmuserauth service create –data-access-method object –type local –ks-dns-name cesobjnode –enable-ks-ssl –ks-admin-user admin –ks-admin-pwd Password –ks-swift-user swift –ks-swift-pwd Password
mmcesobjcrbase: Validating execution environment.
mmcesobjcrbase: Configuring Keystone server in /gpfs/cesfs/ces/object/keystone.
mmcesobjcrbase: Initiating action (start) on postgres in the cluster.
2015-09-08 19:03:15.772 38404 WARNING keystone.cli [-] keystone-manage pki_setup is not recommended for production use.
mmcesobjcrbase: Validating Keystone environment.
mmcesobjcrbase: Validating Swift values in Keystone.
mmcesobjcrbase: Configuration complete.
Object configuration with local database as the identity backend has completed successfully.
Object authentication configuration completed successfully.
Let’s verify the configuration by running mmuserauth service list:
FILE access not configured
PARAMETERS VALUES
————————————————-
OBJECT access configuration : LOCAL
PARAMETERS VALUES
————————————————-
ENABLE_KS_SSL true
ENABLE_KS_CASIGNING false
KS_ADMIN_USER admin
We should notice ENABLE_KS_SSL is set to true.
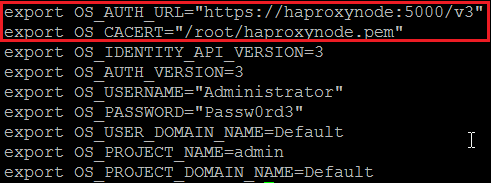
Finally, our openrc file should have a new variable named OS_CACERT which points to our ssl certificate:
export OS_CACERT=”/etc/keystone/ssl/certs/ssl_cacert.pem”
export OS_AUTH_URL=”https://cesobjnode:35357/v3″
export OS_IDENTITY_API_VERSION=3
export OS_AUTH_VERSION=3
export OS_USERNAME=”admin”
export OS_PASSWORD=”Password”
export OS_USER_DOMAIN_NAME=Default
export OS_PROJECT_NAME=admin
export OS_PROJECT_DOMAIN_NAME=Default
After we load our new openrc file, we should be able to execute openstack swift commands as expected.
Configuring Object with LDAP authentication:
If Object authentication was previously configured, then we must first remove the existing configuration before we can reconfigure authentication to use LDAP:
mmuserauth service remove –data-access-method object
mmuserauth service remove: Command successfully completed
mmuserauth service remove –data-access-method object –idmapdelete
mmuserauth service remove: Command successfully completed
We are now ready to configure Object Authentication with LDAP:
mmuserauth service create –type ldap –data-access-method object –user-name “cn=manager,dc=essldapdomain” –password “Passw0rd” –base-dn dc=isst,dc=aus,dc=stglabs,dc=ibm,dc=com –ks-dns-name 192.168.6.99 –ks-admin-user mamdouh –servers 9.3.101.55 –user-dn “ou=People,dc=essldapdomain” –ks-swift-user swift –ks-swift-pwd Passw0rd
Note: Both the –ks-admin-user and the –ks-swift-user specified in the command must already exist in LDAP.
mmcesobjcrbase: Validating execution environment.
mmcesobjcrbase: Performing SELinux configuration.
mmcesobjcrbase: Configuring Keystone server in /gpfs/cesfs/ces/object/keystone.
mmcesobjcrbase: Initiating action (start) on postgres in the cluster.
mmcesobjcrbase: Validating Keystone environment.
mmcesobjcrbase: Validating Swift values in Keystone.
mmcesobjcrbase: Configuration complete.
Object configuration with LDAP as the identity backend has completed successfully.
Object authentication configuration completed successfully.
We can now verify that Object with LDAP authentication was properly configured using the mmuserauth service list command:
mmuserauth service list –data-access-method object
OBJECT access configuration : LDAP
PARAMETERS VALUES
————————————————-
ENABLE_ANONYMOUS_BIND false
ENABLE_SERVER_TLS false
ENABLE_KS_SSL false
USER_NAME cn=manager,dc=essldapdomain
SERVERS 9.3.101.55
BASE_DN dc=isst,dc=aus,dc=stglabs,dc=ibm,dc=com
USER_DN ou=people,dc=essldapdomain
USER_OBJECTCLASS posixAccount
USER_NAME_ATTRIB cn
USER_ID_ATTRIB uid
USER_MAIL_ATTRIB mail
USER_FILTER none
ENABLE_KS_CASIGNING false
KS_ADMIN_USER mamdouh
Refer to the ‘Validating Object Authentication Using swift and openstack clients‘ section in order to validate whether Object Authentication is working as expected.
Object with AD Authentication:
Assuming that we configured Object with LDAP in the previous step, before we can configure Object with AD, we must remove the existing Object authentication configuration, including the ID Mapping.
Once again, let’s first remove the existing Object authentication configuration using the mmuserauth service remove command:
mmuserauth service remove –data-access-method object
mmuserauth service remove: Command successfully completed
Next, we will remove the existing ID Mapping:
mmuserauth service remove –data-access-method object –idmapdelete
mmuserauth service remove: Command successfully completed
Finally, let’s validate the removal using the mmuserauth service list command:
mmuserauth service list –data-access-method object
OBJECT access not configured
PARAMETERS VALUES
————————————————-
We’re now ready to configure Object with AD:
mmuserauth service create –type ad –data-access-method object –user-name “cn=Administrator,cn=Users,dc=adcons,dc=spectrum” –password “Passw0rd3” –base-dn “dc=adcons,dc=spectrum” –ks-dns-name 192.168.6.99 –ks-admin-user Administrator –ks-swift-user swift –ks-swift-pwd Passw0rd2 –servers 9.18.76.50 –user-id-attrib cn –user-name-attrib sAMAccountName –user-objectclass organizationalPerson –user-dn “cn=Users,dc=adcons,dc=spectrum”
Note: Both the –ks-admin-user and the –ks-swift-user specified in the command must already exist in AD.
mmcesobjcrbase: Validating execution environment.
mmcesobjcrbase: Performing SELinux configuration.
mmcesobjcrbase: Configuring Keystone server in /gpfs/cesfs/ces/object/keystone.
mmcesobjcrbase: Initiating action (start) on postgres in the cluster.
mmcesobjcrbase: Validating Keystone environment.
mmcesobjcrbase: Validating Swift values in Keystone.
mmcesobjcrbase: Configuration complete.
Object configuration with LDAP (Active Directory) as the identity backend has completed successfully.
Object authentication configuration completed successfully.
Let’s verify that Object with AD as the authentication backend has been configured as expected:
mmuserauth service list –data-access-method object
OBJECT access configuration : AD
PARAMETERS VALUES
————————————————-
ENABLE_ANONYMOUS_BIND false
ENABLE_SERVER_TLS false
ENABLE_KS_SSL false
USER_NAME cn=Administrator,cn=Users,dc=adcons,dc=spectrum
SERVERS 9.18.76.50
BASE_DN dc=adcons,dc=spectrum
USER_DN cn=users,dc=adcons,dc=spectrum
USER_OBJECTCLASS organizationalPerson
USER_NAME_ATTRIB sAMAccountName
USER_ID_ATTRIB cn
USER_MAIL_ATTRIB mail
USER_FILTER none
ENABLE_KS_CASIGNING false
KS_ADMIN_USER Administrator
Configuring Object with AD-TLS (The same exact steps can be followed to configure LDAP-TLS)
In order to configure Object with AD-TLS, we need to copy the TLS certificate to the local ces node. The TLS certificate should be named object_ldap_cacert.pem and copied to /var/mmfs/tmp
If Object authentication was previously configured, we need to remove the existing authentication first before we can proceed:
mmuserauth service remove –data-access-method object
mmuserauth service remove: Command successfully completed
Next, we will remove the existing ID Mapping:
mmuserauth service remove –data-access-method object –idmapdelete
mmuserauth service remove: Command successfully completed
Finally, let’s validate the removal using the mmuserauth service list command:
mmuserauth service list –data-access-method object
OBJECT access not configured
PARAMETERS VALUES
————————————————-
We’re now ready to configure Object with AD-TLS:
–enable-server-tls needs to be specified in order to configure server TLS
mmuserauth service create –type ad –data-access-method object –user-name “cn=Administrator,cn=Users,dc=adcons,dc=spectrum” –password “Passw0rd3” –base-dn “dc=adcons,dc=spectrum” –ks-dns-name cesobjnode –ks-admin-user Administrator –ks-swift-user swift –ks-swift-pwd Passw0rd2 –servers AD-CONS.adcons.spectrum –user-id-attrib cn –user-name-attrib sAMAccountName –user-objectclass organizationalPerson –user-dn “cn=Users,dc=adcons,dc=spectrum” –enable-server-tls
mmcesobjcrbase: Validating execution environment.
mmcesobjcrbase: Performing SELinux configuration.
mmcesobjcrbase: Configuring Keystone server in /gpfs/cesfs/ces/object/keystone.
mmcesobjcrbase: Initiating action (start) on postgres in the cluster.
mmcesobjcrbase: Validating Keystone environment.
mmcesobjcrbase: Validating Swift values in Keystone.
mmcesobjcrbase: Configuration complete.
Object configuration with LDAP (Active Directory) as the identity backend has completed successfully.
Object authentication configuration completed successfully.
Let’s verify that Object with AD-TLS as the authentication backend has been configured as expected:
mmuserauth service list –data-access-method object
OBJECT access configuration : AD
PARAMETERS VALUES
————————————————-
ENABLE_ANONYMOUS_BIND false
ENABLE_SERVER_TLS true
ENABLE_KS_SSL false
USER_NAME cn=Administrator,cn=Users,dc=adcons,dc=spectrum
SERVERS 9.18.76.50
BASE_DN dc=adcons,dc=spectrum
USER_DN cn=users,dc=adcons,dc=spectrum
USER_OBJECTCLASS organizationalPerson
USER_NAME_ATTRIB sAMAccountName
USER_ID_ATTRIB cn
USER_MAIL_ATTRIB mail
USER_FILTER none
ENABLE_KS_CASIGNING false
KS_ADMIN_USER Administrator
ENABLE_SERVER_TLS should be set to true.
We are now ready to execute openstack and swift commands!